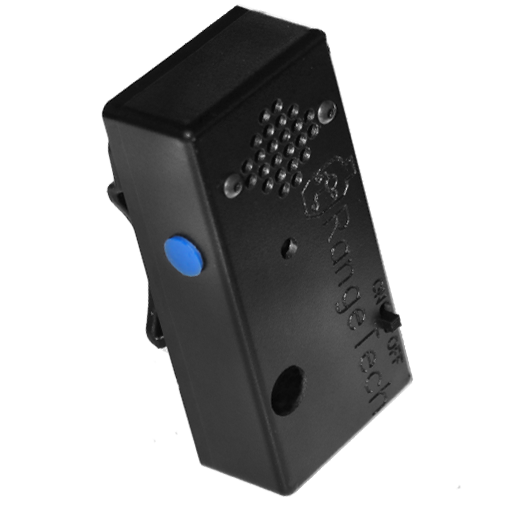
Bluetooth Device
The bluetooth device is compatible with iOS and Android devices, and does not experience any device-specific issues due to using its own dedicated hardware.
Approximate maximum range of the Bluetooth connection is 75ft, but this can vary widely by environment and what the host device (phone/tablet) is capable of. In some cases, it may be as little as 15 ft.
If there is a disconnect while detecting shots, the final “lost shot” can and will be automatically recovered when reconnected, ensuring that accurate recording and scoring can take place. Reconnecting is automatic.
Dual Purpose Button
- Press Once: Starts/restarts the shot timer
- Press and Hold: Stops shot detection, and audibly announces the raw total time* via the phone’s speakers.
- When RO-ing another shooter, this button can be disabled from the app.
LED indicator
Intermittent short flashes mean that there is no connection currently. The LED also lights up for start and par signals*.
On/Off Switch
The device will also “sleep” if left on with no connection or activity. Sleep mode is indicated by 3 short chirps.
Charging Port
Use any common mini-USB charger. Takes approximately 2 hours to charge fully, and lasts approximately 8 hours of typical usage on a single charge.
Serial Number
Located on the back of the shot timer, near the open side of the belt-clip. This is also how to identify a particular RangeTech timer in bluetooth options, as that serial number will be broadcast as part of the device's ID.
Shot Sensor
In general, you will want to keep this pointed towards the shooter/gun without obstructions.
Speaker
Makes the start beep and par beep. A single short chirp indicates that the timer has been connected. 2 chirps means that the timer has been disconnected.
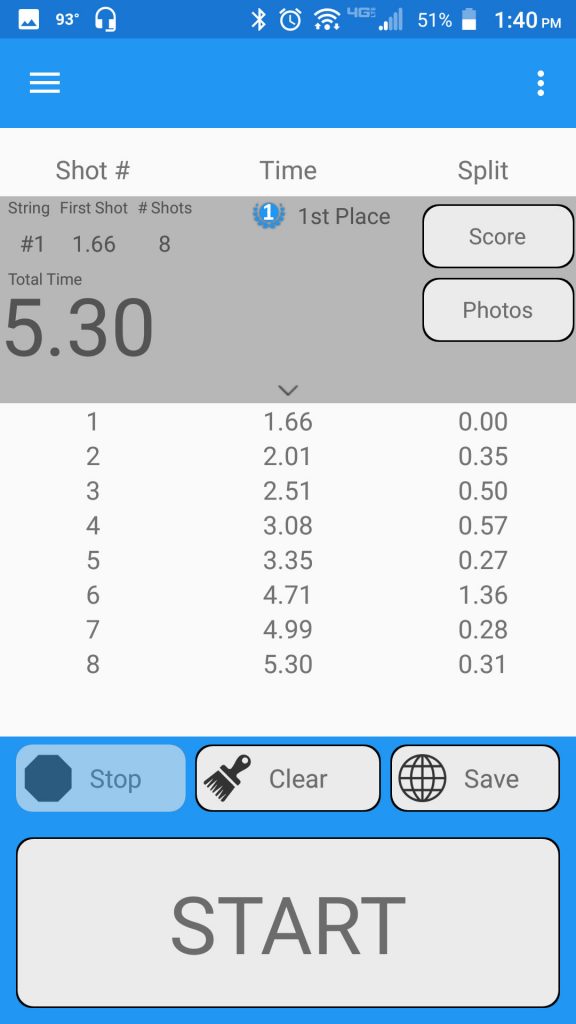
Main Screen
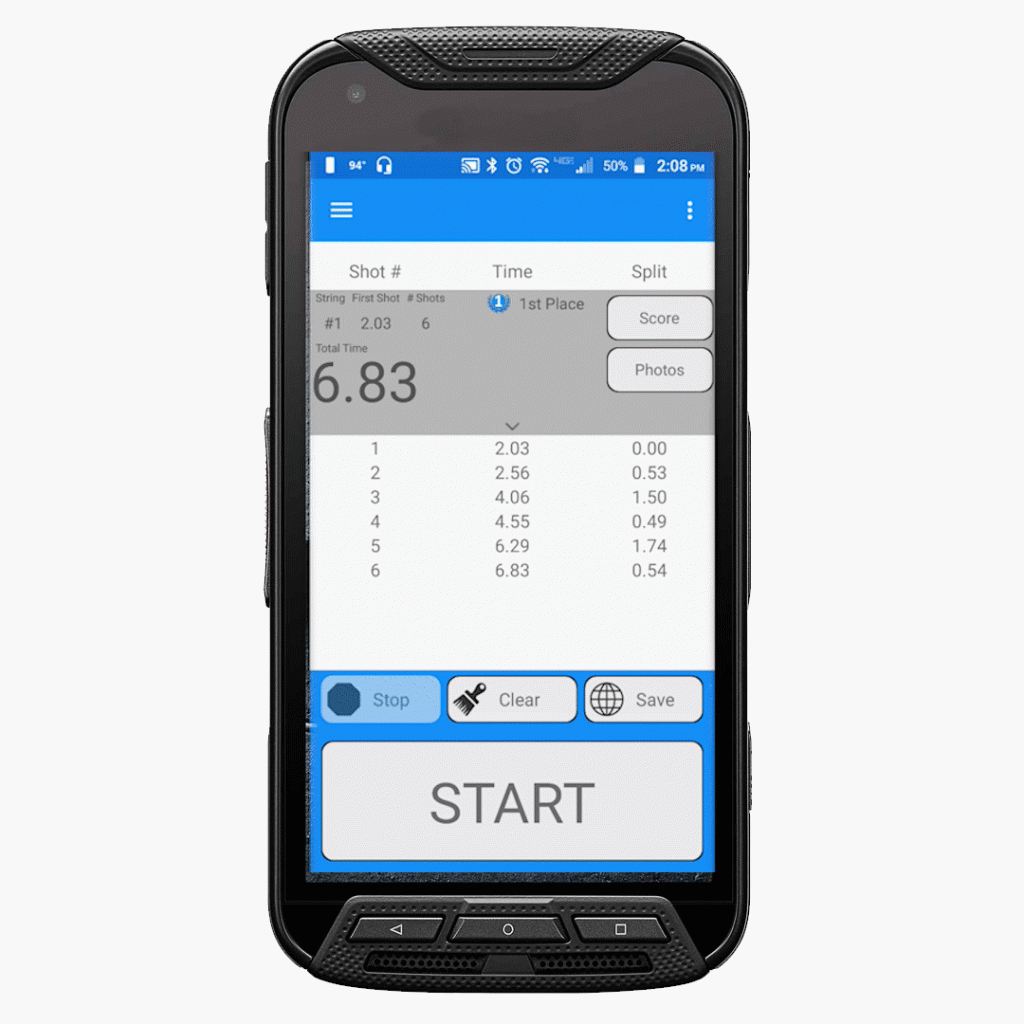
The main screen in RangeTech is where you can actually run the shot timer from.
Shot Timer Basics
For the most part, RangeTech is similar in basic operation to other shot timers. You press “START”, the timer beeps, you shoot, and the shot timer records the time of each shot, in seconds from the start beep. This allows you to measure your reaction time and overall shooting speed.
- A “String” is a single run of the shot timer, from a single start beep, and any shots taken after that start beep.
- Every string has a grey “header” where commonly referenced statistics about that string are shown. These update as shots are recorded.
- Each row in the timesheet represents a single shot. These appear as shots are recorded. The shots that belong to a string are displayed below each string.
- “Shot Number” is a sequential numbering of the shots within a string, in the order they happened.
- “Shot Time” is the time, in seconds, that a particular shot was after the start beep.
- “Split Time” is time, in seconds, between .
The grey area above each sting provides a quick summary of that particular string.
- “String #” is the number of the given string. RangeTech can record, store, and display and unlimited number of strings
- “First Shot” is the shot time (time since the beep in seconds) of the very first shot in that string, for quick reference.
- “Total Time” is the shot time of the last/most recent shot in that string. This is the most commmonly used metric.
- “# Shots” is the total number of shots recorded in that string.
- Tapping on the bottom of the string allows you to hide and show that string’s timesheet to reduce clutter.
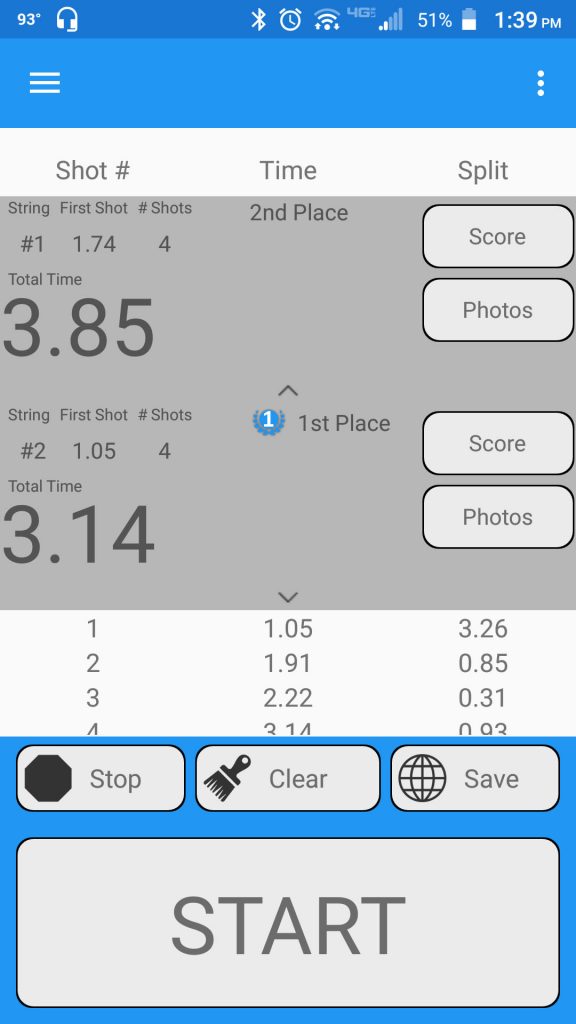
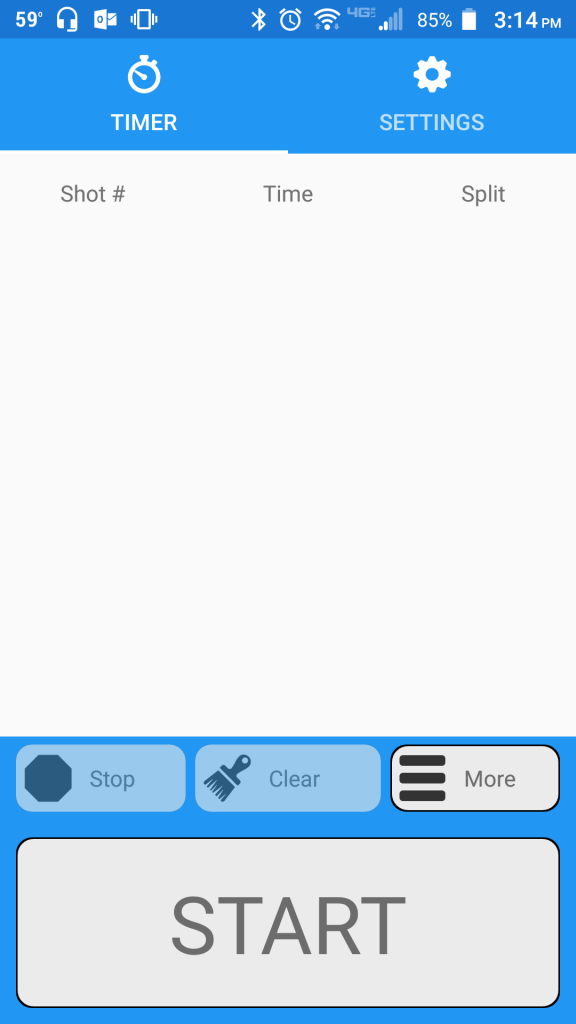
The primary on-screen controls for your shot timer are fairly straight forward. RangeTech allows you to restart infinitely without clearing, if you wish, and you can record, display, and store an unlimited number of strings on the main page.
- “START” allows you to start or restart the shot timer. Each start creates a new string with a new header, timesheet, and string number, EXCEPT when the previous string has no shots, then it will simply restart that string instead of storing a blank string.
- “Stop” allows you to stop shot detection, without taking any other action. This is used in noisier environments or situations to prevent errant shots from being recorded after the shooter is done. You do NOT have to stop in order to restart.
- “Clear” allows you to clear all of the currently held/displayed strings. By default, this has a confirmation message to prevent accidental taps, but the confirmation message can be turned off (or back on) if desired.

The top-right menu in RangeTech allows you to access additional functionality from the main screen.
- “Timer Summary” allows you to veiw TOTAL results of your current strings, such as the total of all the current string’s raw times.
- “Share Screenshot” allows you to use your device’s default sharing dialog to share a simple photo capture of the current screen. You can use this to share on social media, via email, or however you like.
- “Share Link” will upload all of your current strings to a custom webpage, where the results are interactive and can be sorted. This webpage can then be shared wherever or with whomever you like.
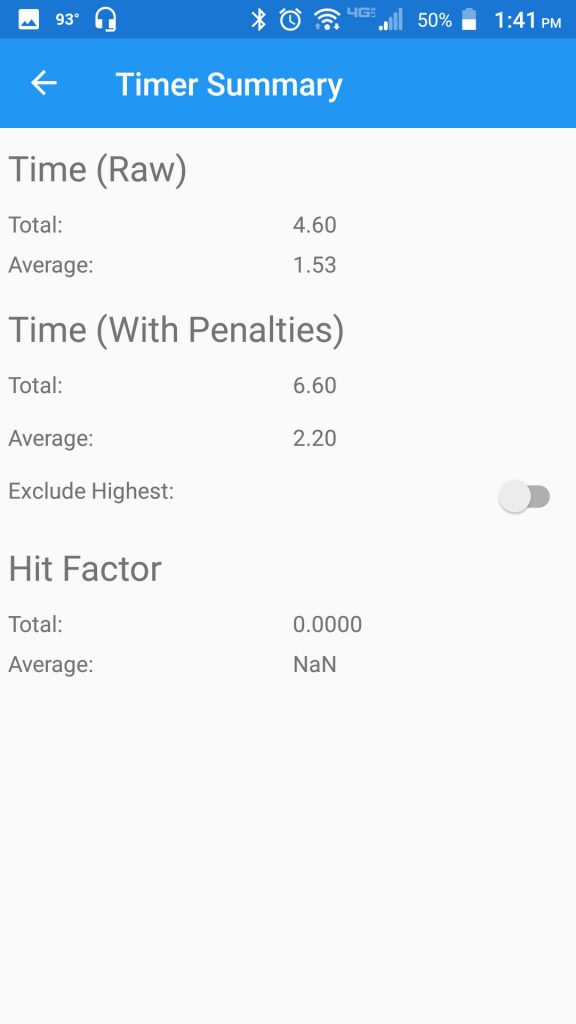
Timer Summary
Timer Summary allows you to quickly see results from multiple strings totaled or averaged together. This is very useful for multi-string courses of fire, such as a law-enforcement qualification. This works with Raw Time, Time with Penalties, and Hit Factor. You can also “Exclude Highest” for discarding the “worst string”, such as is normally done with Steel Challenge.

To see these totals, tap on the top-right menu, and select “Timer Summary”.
Billboard Display
Rotate your device to landscape view to automatically switch to billboard mode. Billboard mode is a paired-down, large-font veiw for simplified usage and reading from a distance.
Billboard mode only displays basic controls, basic data about the current string, and only the current/most recent string. To return to normal display, with full options, rotate your phone back to portrait veiw.
Scoring
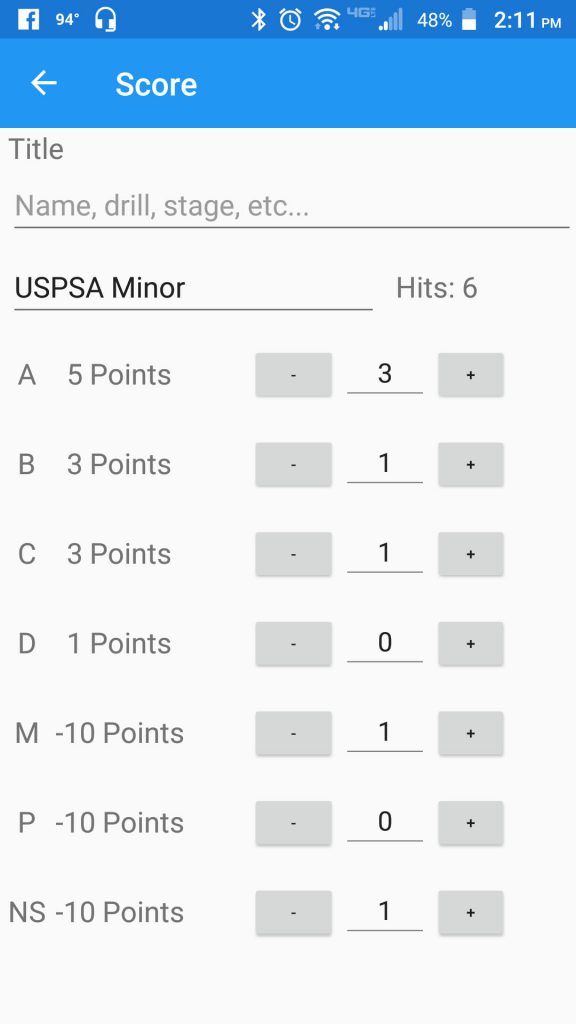
Once you have shot a string, you have the option of scoring it by tapping on the score button in that string's header.
"Title" allows you to enter additional information about that string, such as the shooter's name, the stage name, or whatever you like. This is primarily used to help with sorting if you save the string.
You can change the scoring scheme for each string without affecting any other string. It is recommended to use a scoring scheme that you are already familiar with. The "(simple)" scoring schemes allow you to input raw values, such as total number of points or total amount of time to add to the raw total.
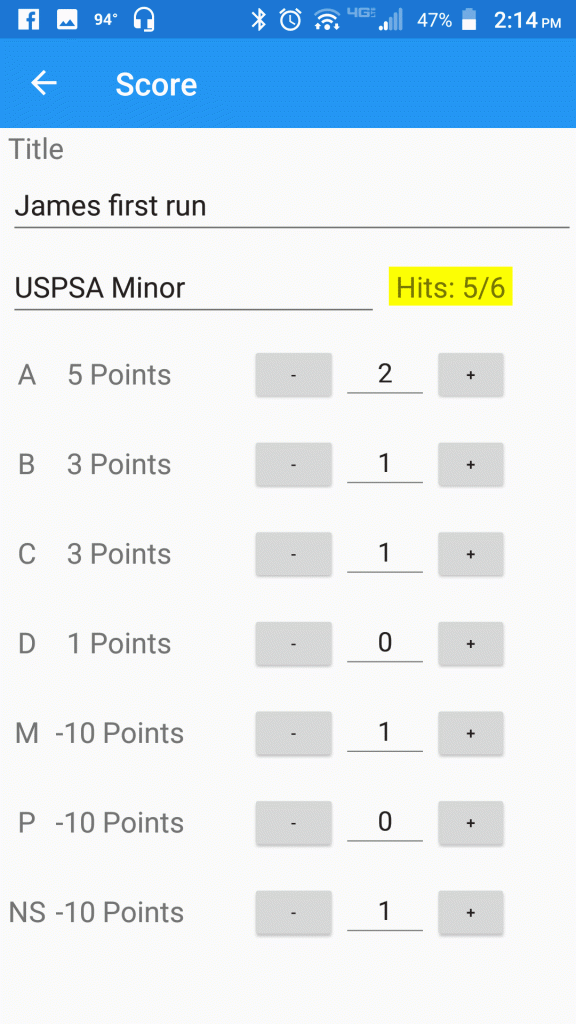
Scoring schemes other than "(simple)" are more in-depth and easier to use. They provide one or more scoring inputs representing common scoring items used with those scheme. Each scoring input displays its name, it's effect, and the number of these items applied to this string. For example:
- "NS" (short for no-shoot) is the name of this scoring item
- "-10 points" is the effect per NS entered
- "1" with the "+" and "-" buttons on either side indicates that one NS have been applied to this string, for a total effect of -10 points
Tap the "+" or "-" buttons, or tap the number and type in the value that you want to apply to the current string.
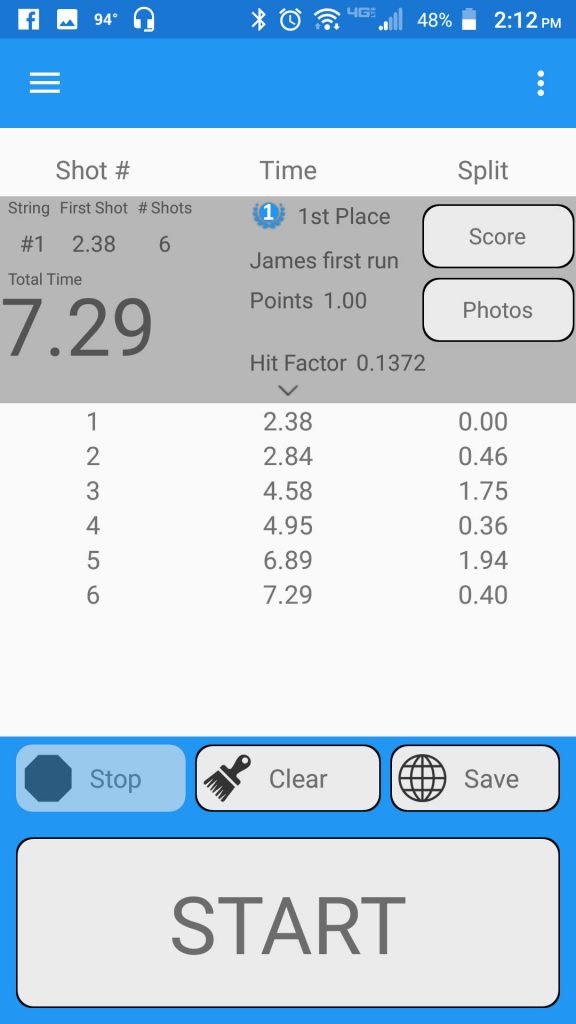

Once you are done scoring, tap the back button to go back to the main page. You will see that your score is now applied to that string.
- The number of points or penalties are now displayed in the string header
- The Hit Factor or Final Total are now displayed in the string header
RangeTech also automatically ranks your current strings. If no scores have been entered for any strings, these ranks will go by fastest total time to slowest. If there is a mix of hit factor and time-penalty scoring, RangeTech will default back to fastest total time to slowest, since the mixed scoring is not comparable.
RangeTech will also display the title, if one was given, for quick reference.
Scoring Settings

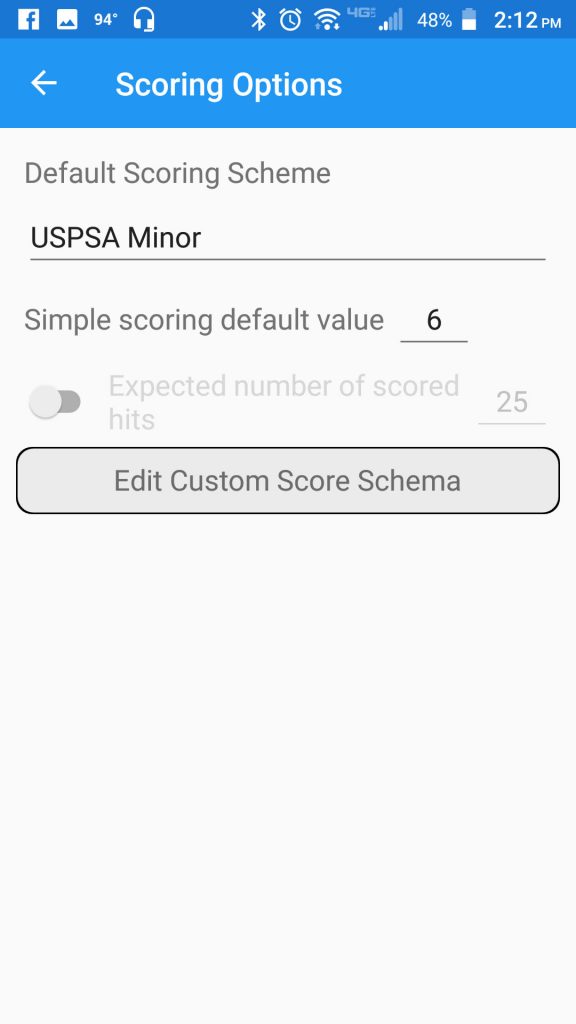
Accessible under the main menu, scoring settings includes additional settings and tools you can use.
- "Default Scoring Scheme" should be set to whatever your most used scoring scheme is, as it determines what the default scoring scheme for each string is when you first open it's scoring dialog.
- "Simple Scoring Default Value" is an option that affects "(simple)" scoring shcemes only. It simply pre-fills the input with that value, which can make scoring faster and easier in some circumstances.
Expected Number of Scored Hits
"Expected number of scored hits" is a scoring validation tool that can be used with any of the scoring schemes except "(simple)" ones.
Expected scored hits indicates the number of required hits that should be scored for each string. For example, if a USPSA stage includes two paper and one steel, the expected number of scored hits should be set to five.
Expected Number of Scored Hits (continued)
Then, when you are scoring, the "Hits" will display the number of currently scored hits over the number of expected scored hits. This number will be amber when not enough hits have been scored, green when the correct number has been scored, and red if too many hits have been scored.
Not all inputs under a scoring scheme count as a "hit". Under USPSA, for example, only the A, B, C, D, and M count as scored hits. NS (no shoot) and P (Proceedural) do not, as these do not replace an expected scored hit.
Custom Scoring Schema
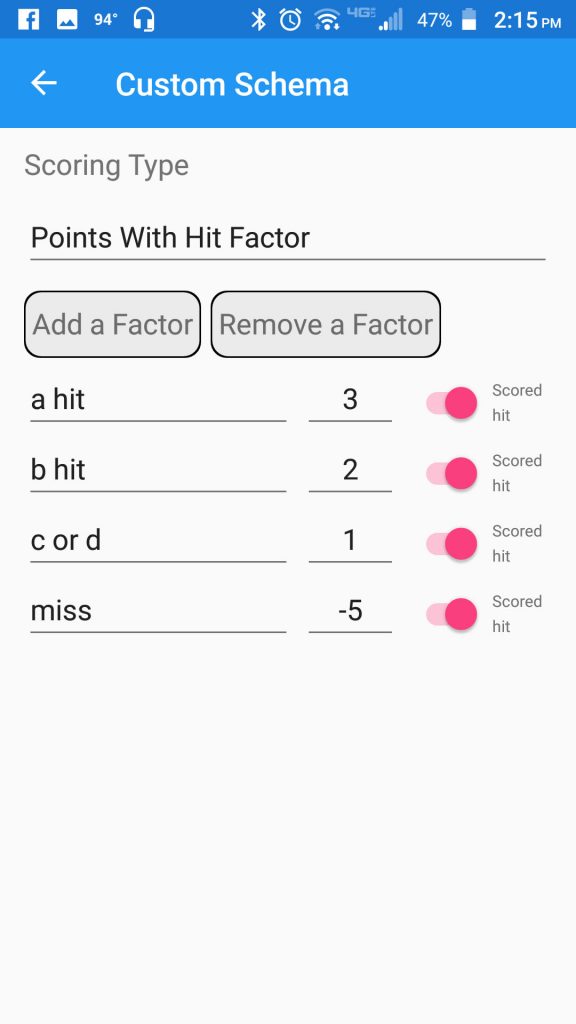
Under the scoring scheme selection you can choose to use your custom scoring scheme. By default, this is empty and cannot be used, so you will need to set it up. You can also set it up or change it under the scoring options in the main menu.
- "Scoring Type" is either "Points With Hit Factor", such as USPSA type scoring or "Time Plus Penalties", such as IDPA.
- "Add a Factor" will create a new scoring item at the bottom of the list
- "Remove a Factor" will remove the last scoring item on the list
- You then give each factor a name
- Enter the number, including negative numbers, for what effect it has
- Turn "Scored hit" on or off to control whether this factor counts as a scored hit or not.

For all dialogs, clicking on the back button will take you back to the previous screen. Any changes are automatically saved.
Photos
You can also attach photos to your strings. These can be photos of targets to document accuraccy, photos of a stage to remind you how it was set up, or whatever you like.
Tap the "Photos" button for the string to get started. From there you can take new photos or delete existing ones using your device's built-in cameras. Remember that the photos are only attached to that specific string. They are displayed at the bottom of the timesheet, and are show or hidden by tapping on the bottom of the timesheet header.
These photos will be saved or shared with these strings, if you save or share them.
Saving
Currently, all RangeTech customers have free online saving and sharing of their strings. All scoring, titles, photos and other data related to the string will be saved with it. Saving does require you to sign in. The accounts for saving are free. You will need to create an account.
Once you have signed in on the device, save your current strings by tapping the "Save" button. If there is only one string, it will automatically save without any other input.
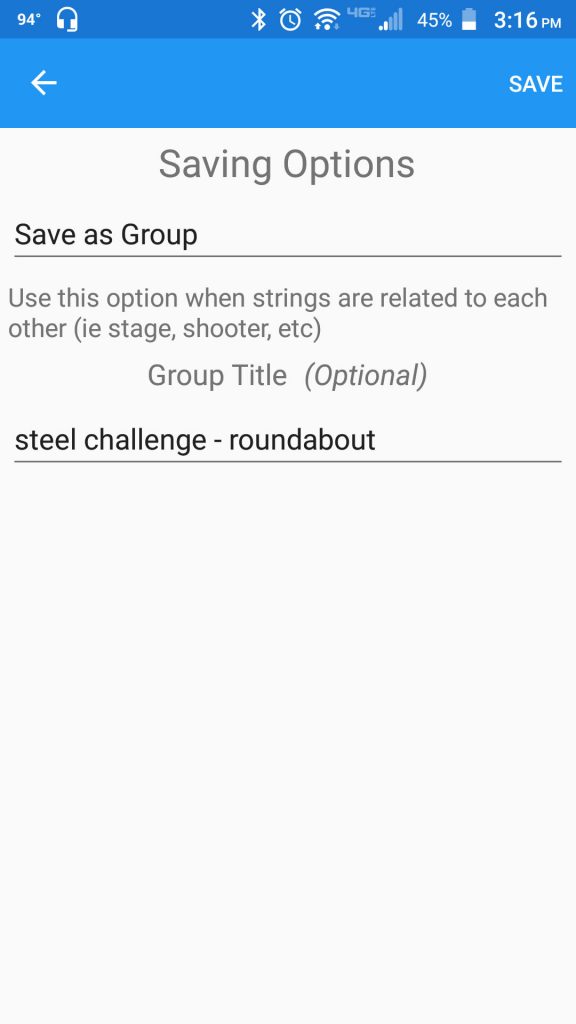
If you have multiple strings on saving, you will have some additional options.
- "Save as Group" means that these strings will be saved, stored, and always displayed together. This is used when the strings have something in common, such as the shooter or stage. Groups of strings can be totaled up and scored as a group.
- "Save as Individual Strings" means that these strings will be saved independently and not grouped together. This is used when the strings are more general, such as a daily practice routine, and generally won't be totaled with each other since they have nothing in common, scoring-wise.
- When saving as a group, you can also give the group a title, similar to the string title, this is a note to help you identify and sort that group, and the strings in it, later on.
You will then want to tap save

to confirm, or the back button to cancel.
Reviewing Saved Data
Accessing from within RangeTech

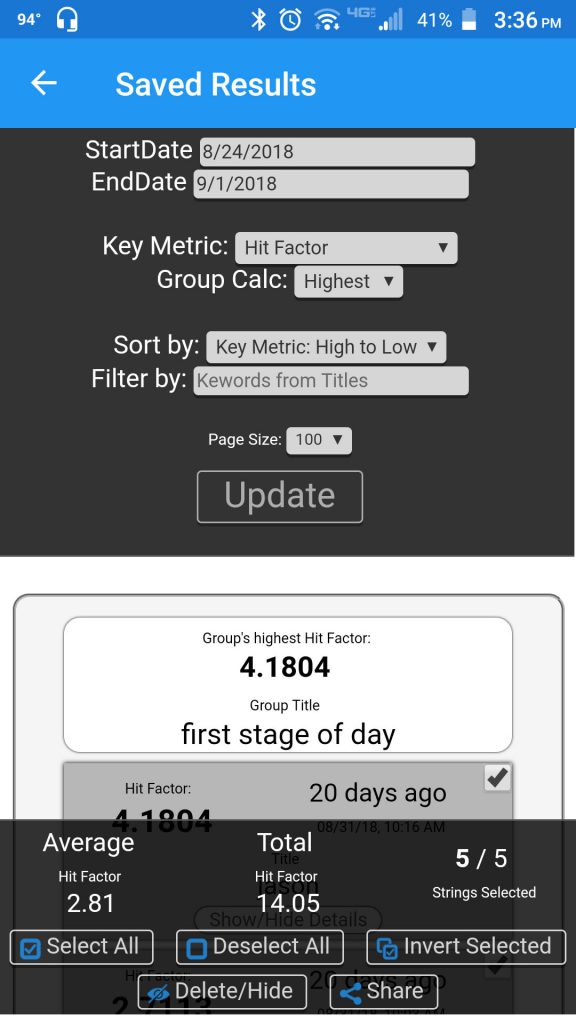
Open the main menu and click on "Saved Results". Occasionally, you may need to provide your login information.
Accessing from any other device
You can go to our site, and click on "Access Saved Results" to log in and have full access to your saved strings and groups from any device with an internet connection. Here is a direct link: Click Here
- "StartDate" and "EndDate" are entered as the oldest and newest results you would like displayed.
- "Key Metric" is put most simply as "the thing you care about". If you are interested in hit factor, then select that. If you want to focus on just the first shot times, select that.
- "Group Calc" is how you want the Key Metric to be calculated for groups.
- "Sort by" is how you want strings and groups to be sorted, i.e. in what order.
- "Filter by" allows you to enter text to filter for certain results, based on the string or group titles you entered.
- "Page size" controls how many results you want displayed. Setting this number higher than the default may cause long processing times.
Tap the "Update" button after making any changes to these feilds to see the results.
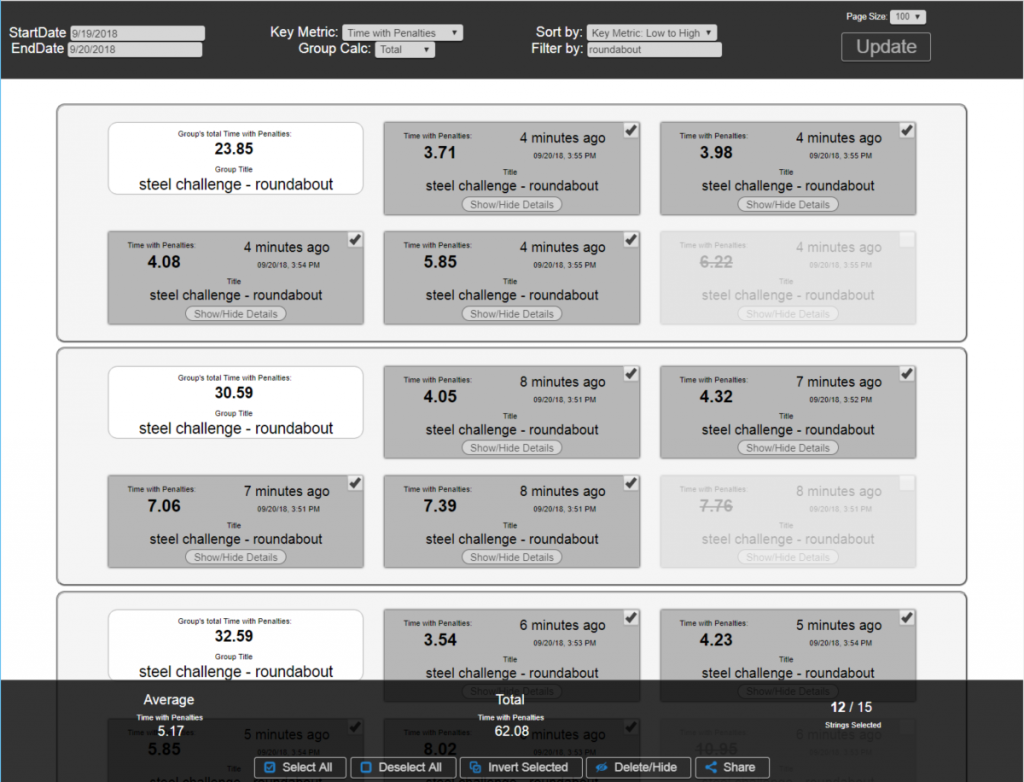
In this example...
We wanted to find our best runs of a certain steel challenge stage called "roundabout".
- Our date filtering was set to today, since those are the only results we want to see right now.
- "Key Metric" was set to "Time with Penalties", since that is how steel challenge is scored (+3 seconds for misses or proceedurals).
- "Group Calc" was set to "Total", since each group includes the 5 standard runs, and we want to see the sum of the total times from all strings.
- "Sort by" was set to "Key Metric: Low to High", so that the best runs float to the top.
- "Filter by" was set to "roundabout", so we only see results that have the name in the title.
We then tapped "Update" to apply these settings.
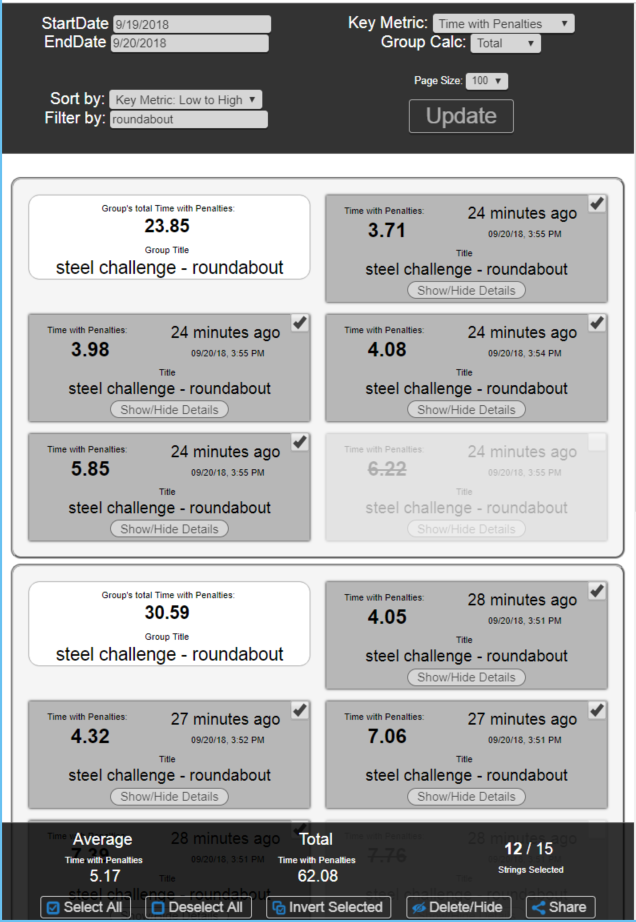
Each string is displayed as a condensed header, showing only the key metric, when it was saved, and the title. You can tap on "show hide" details for each string to see the timesheet, other data, and even the photos that were saved with that string.
Each group of strings is wrapped in a border and shows the group's key metric (based on the "Group Calc" setting) as well as the group's title, if there is one.
Each string includes a checkbox. You can tap this checkbox to exclude a string from the statistics at the bottom of the page.
- "Average" is the average of the key metrics for all of the selected strings.
- "Total" is the total of the key metrics for all of the selected strings.
- "Strings Selected" is the number of currently selected strings over the total strings displayed.
At the bottom of the page there are controls to manage your saved results.
- "Select All" will select all strings currently displayed.
- "Deselect All" will select none of the strings.
- "Invert Selected" changes each string to the opposite of it's current selected/unselected state.
- "Delete/Hide" will, after confirmation, hide the selected strings permanently, to exclude them from future calculations. Hidden strings will still be displayed as a small button, that can be tapped to restore them.
In this example...
We would de-select the bottom string from each group, since the worst of the five runs are discarded in steel challenge scoring. The group's header will then display the accurate score for each group, by steel challenge rules.
Optionally, we could then tap on "Invert Selected" to select only those worst runs in each group (the opposite of what was just selected) and then tap "Delete/Hide" to remove them more permantently. This will cause those worst strings to be excluded from any scoring calculations in the future, so they do not have to be individually unselected again.
Another Example
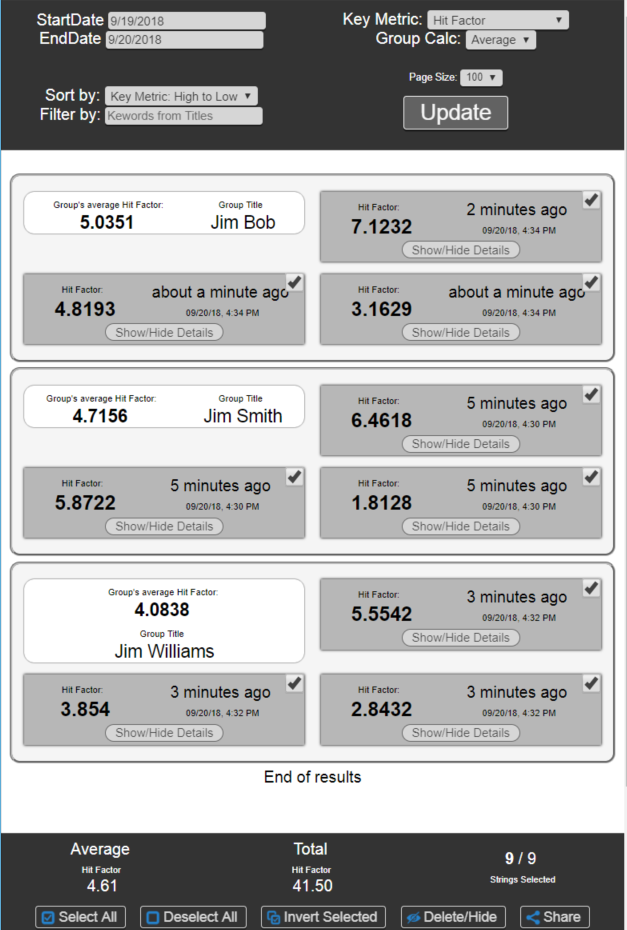
In this example, we want to see who won a USPSA stage. There were three shooters, and each shooter had three strings. Those three strings were saved as groups.
- Our date filtering should be set appropriately.
- "Key Metric" was set to "Hit Factor", since that is how USPSA is scored.
- "Group Calc" was set to "Average", since we want to see the hit factor for each shooter.
- "Sort by" was set to "Key Metric: High to low", so that the best runs float to the top.
- "Filter by" was left empty, since it wansn't needed.
Then we clicked on "Update". We would then immediately see that Jim Bob was this stage's winner, since his three runs had the highest average hit factor.
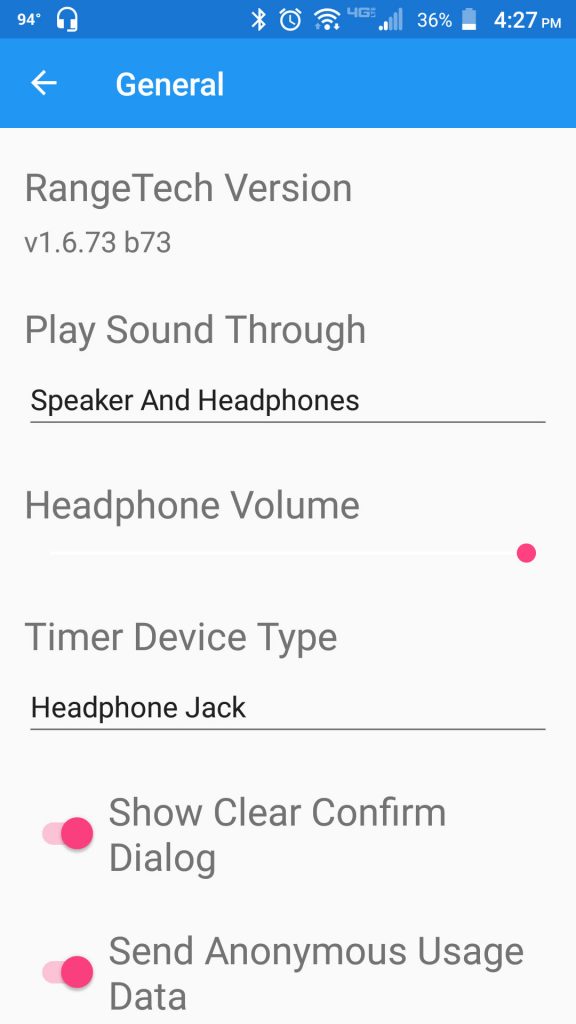
General Settings

General Settings, found under the main menu , includes various settings for the app and device.
- "RangeTech Version" documents what version of the app you are currently running.
- "Play Sound Through" allows you to select only headphones, if you do not want the phone's built-in speakers to make any noise.
- "Headphone Volume" allows you to adjust the volume of the sounds that come through the attachment's headphone port.
- "Timer Device Type" allows you to change what type of device the app is expecting to work with currently.
- "Show Clear Confirm Dialog" allows you to enable or disable the confirmation dialog when you hit clear on the main screen.
- "Send Anonymous Usage Date" allows the app to make basic reports to our server, so we can make improvements to the app to increase usability.
- "Restore Defaults" will restore all settings within the app to their installation presets. It is recommended to also restart your device entirely after tapping this button..

For all dialogs, clicking on the back button will take you back to the previous screen. Any changes are automatically saved.
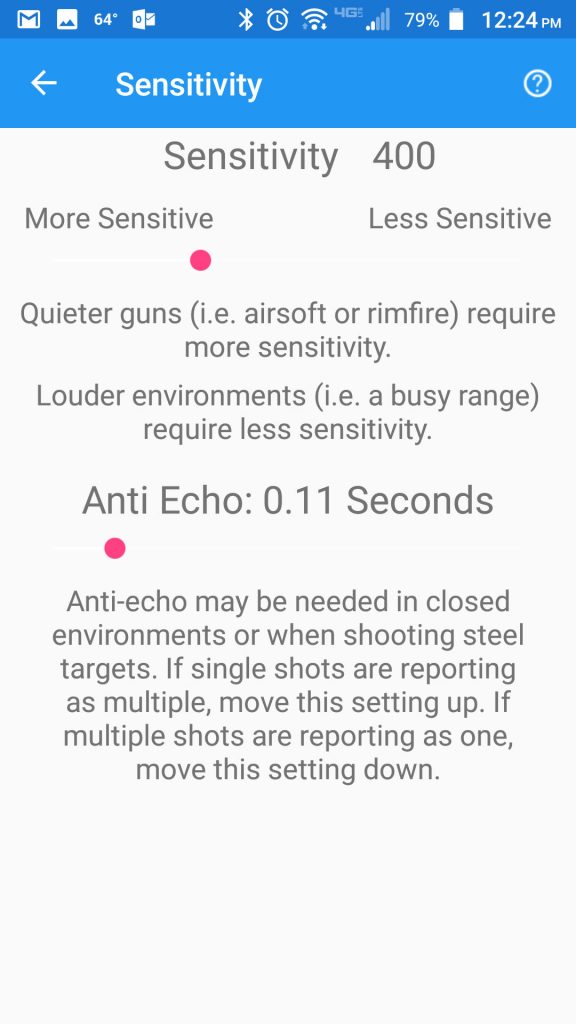
Sensitivity Settings
Like all shot timers, you can adjust the sensitivity settings, found under the main menu , for RangeTech to better suit your situation.
- "Current Sensitivity" is displayed as a number value, for quick reference. Adjust the slider below this to the left or the right to change sensitivity.
- "Anti-Echo" is essentially a minimum split time rule, and can be adjusted using the slider below the current number display. If this setting is set to 0.11, and an echo, steel target, or other noise occurs within 0.11 of a shot, it will be ignored as just part of that same shot.
For all dialogs, clicking on the back button will take you back to the previous screen. Any changes are automatically saved.
Sensitivity Troubleshooting
- Moving the sensitivity slider to the right makes RangeTech less sensitive to noises, meaning it will be less likely to pick up interference, such as other nearby shooters or close steel impacts, but may also be less able to hear the gunshots you want it to hear.
- Moving the sensitivity slider to the left makes RangeTech more sensitive to noises, meaning it will be able to hear quieter or further-away guns, but may be more susceptible to interference from other loud noises.
- Environmental and physical factors can have a major impact on what sensitivity level works best for you. Indoor ranges vs outdoor, muzzle brakes, caliber, barrel length, other shooters nearby, what direction the shot sensor is faceing, and many other things can affect this.
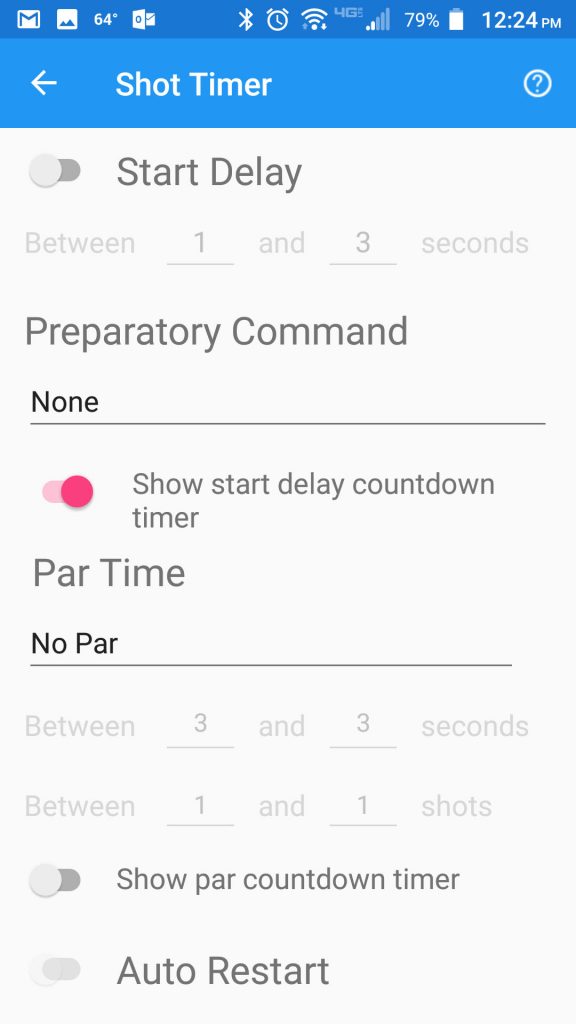
Timer Settings
Timer Settings, found under the main menu , contains most of your commonly changed and accessed shot timer settings.
- "Start Delay" can be turned on or off using the switch. Turning it off means the timer will start, and sound the start signal, instantly when the "START" button is tapped. Start delay can be adjusted by changing the range on the two numbers. If a fixed, non-random delay is desired, simply set the two numbers to the same value.
- "Preparatory Command" is an optional sound the phone will make before the start delay or timer starts.
- "Show start delay countdown timer" controls wether or not a countdown timer will be shown on the main screen between when "START" is tapped and the timer starts.
For all dialogs, clicking on the back button will take you back to the previous screen. Any changes are automatically saved.
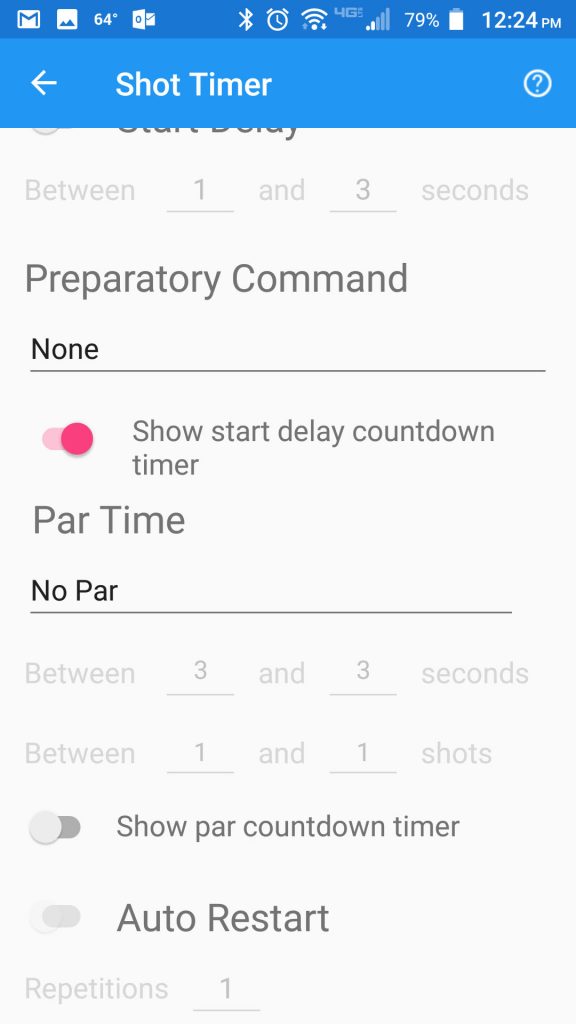
Par Options
Par is a common feature on most shot timers, and is signifigantly expanded in options with RangeTech. The basic idea is that you can set a goal or limit based on time or number of shots.
- "No Par" means all par settings are off.
- "Time" means that par will be signaled when a certain time limit/goal has been reached.
- "Shots" means that par will be signaled when a certain number of shots goal/limit has been reached.
- "Time And Shots" means that par will be signaled when a certain number of shots AND a certain time goal/limit has been reached.
- "Time Or Shots" means that par will be signaled when a certain number of shots OR a certain time goal/limit has been reached. Whichever is reached first.
The "Between __ and __ seconds" and "Between __ and __ shots" will automatically and visually enable/disable based on the Par setting. A random-range value can be entered for either, or a fixed value can be maintained by setting both the numbers in each setting to the same value.
- "Show par countdown timer" controls wether or not a countdown timer will be shown on the main screen between when the timer starts and par is signaled.
- "Auto Restart" allows the app to automatically restart the shot timer after par has expired, including creating a new string and restarting the start delay. This is very useful to doing multiple repetitions of the same drill without having to interact with the app for each rep.
- "Repetitions" controls how many times the app will automatically restart, if that setting is enabled.
For all dialogs, clicking on the back button will take you back to the previous screen. Any changes are automatically saved.
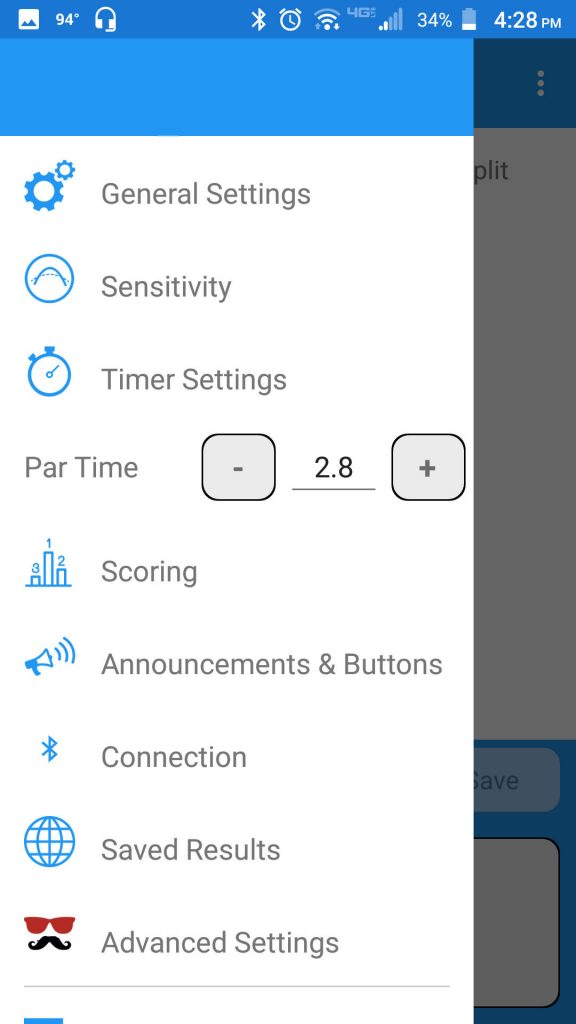
Par Quickchange
A quick adjust option will appear in the main menu area when par is set to "Time", so that par time can be quickly and easily changed. You can use the "+" and "-" for 0.10 adjustments, or tap and type in any number.
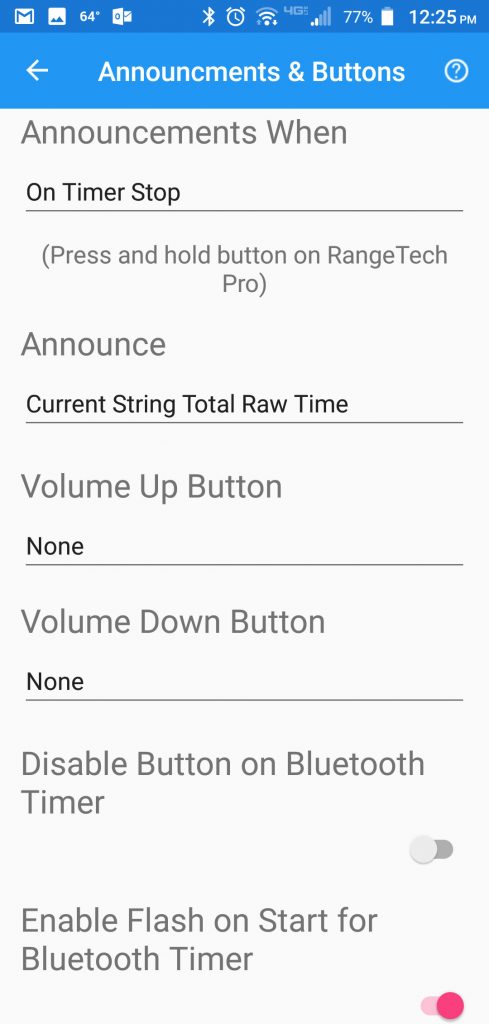
Announcements and Buttons
Found under the main menu
"Announcements When" controls if and when the RangeTech app will audibly announce results.
- "On Timer Stop" means when the timer is stopped, via an assigned button on the device or the button in the app.
- "After Par" means after par (whatever it is set to in timer settings) has been met. This can be especially useful when used with auto-restart.
- "Never" means that the app will never announce results.
"Announcements" controls what the app will audibly announce.
- "Current String Total Raw Time" will announce the time of the final shot from the current/most recent string.
- "Current String First Shot Time" will announce the time of the first shot from the current/most recent string.
- "Current String Number of Shot Before Par" will announce the number of shots that occurred before Par expired (if applicable) from the current/most recent string.
- "All Strings Total Raw Time" will announce the sum of all of the currently displayed string's total raw times.
RangeTech must be able to control your device's volume settings, so the "Volume Up" and "Volume Down" buttons on your device can be assigned to preform additional shortcut funtions, if you prefer. These include "Start Timer" and "Stop Timer".
"Disable Button on Bluetooth Timer" enables or disables all of the dual-purpose button functionality on the timer. You will want to disable the button to avoid accidental presses in some circumstances, such as when ROing with the timer attached to the shooter.
"Enable Flash on Start for Bluetooth Timer" enables or disables the flashing of the LED on the shot timer for start signals. This may be desired during low-light shooting, as the LED is quite bright.
For all dialogs, clicking on the back button will take you back to the previous screen. Any changes are automatically saved.
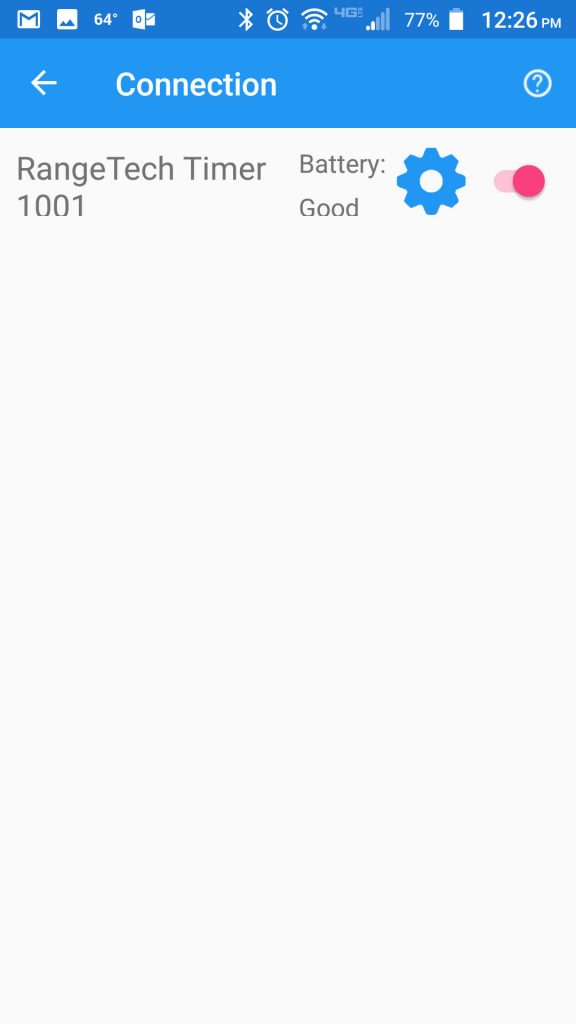
Connections
The connections screen is accessible under the main menu where you can connect, disconnect, and veiw additional information about the bluetooth device.
- The device's serial number is displayed as part of it's broadcasted name, so that a particular shot timer can be found if there is more than one being used in the area.
- The device's battery condition is displayed, and a warning will appear if the battery is too low.
- The on/off switch displays connected status, and allows you to connect or disconnect.
- The gear icon can be used to show additional developer details about the shot timer, but is not useful to most users. If you are a developer, and would like API information for integrating RangeTech into your app, please contact us.
- RangeTech will remember the device it was last connected with, and reconnect when it sees the device, on startup or in the case of an accidental disconnect
- The app can only connect to one device at a time, and each device can only connect to one app at a time.
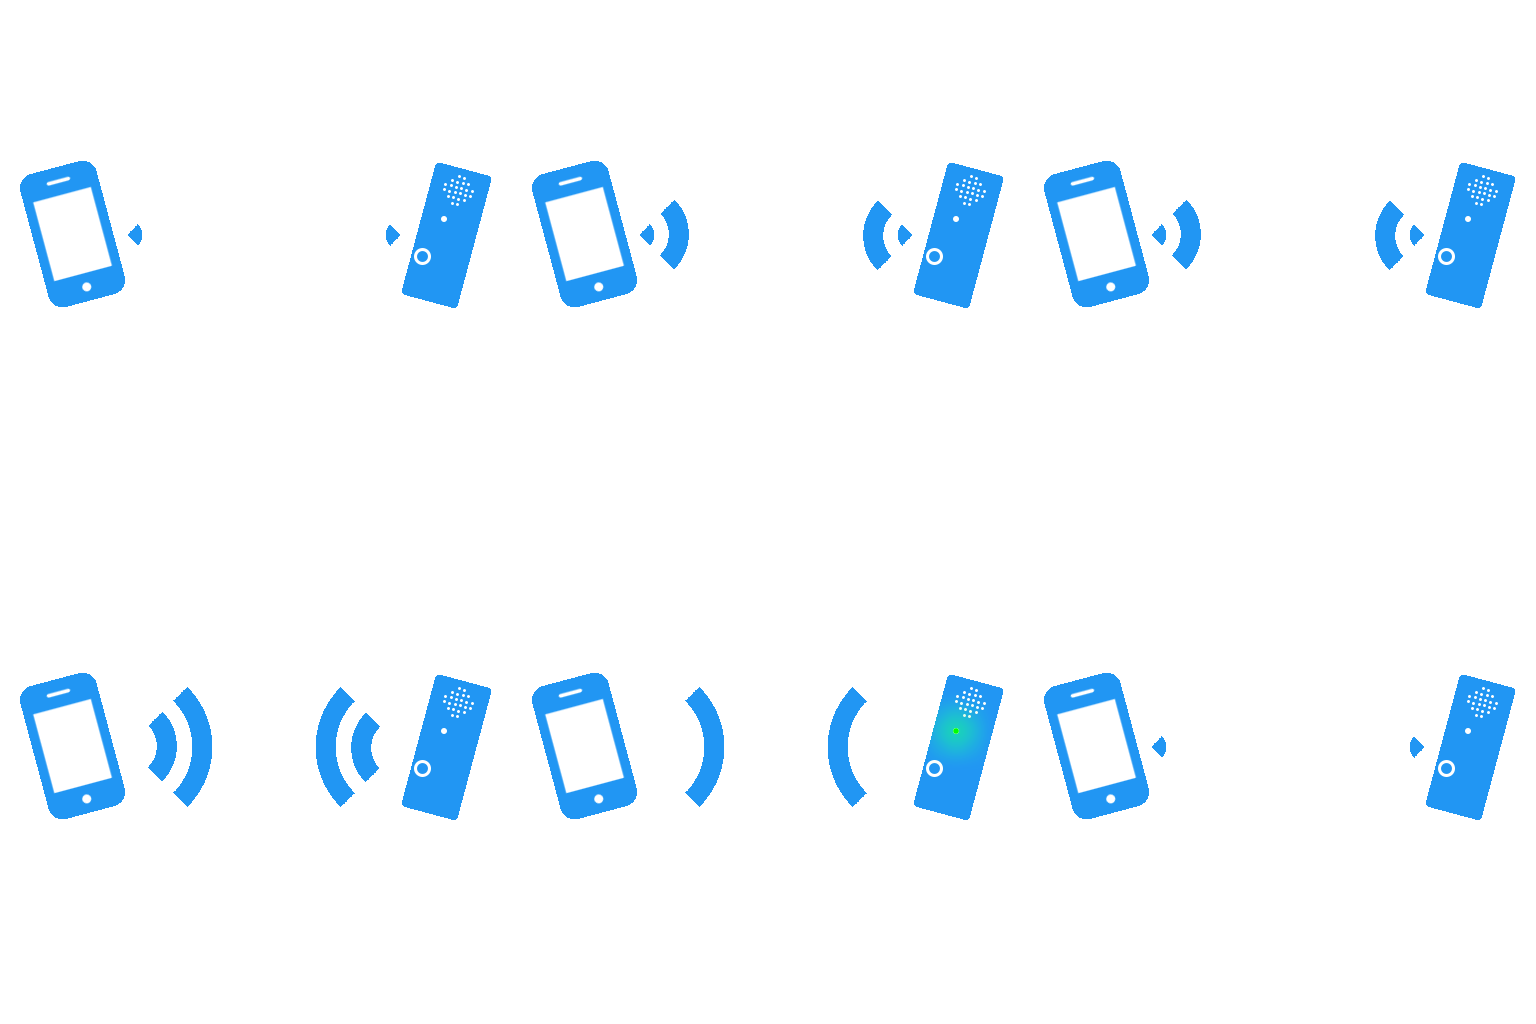
Accidental Disconnects
If an accidental disconnect happens during shooting, RangeTech will automatically begin trying to reconnect with the device. When a reconnection is established, the app and device will check to see if there is a "missing shot" that the device detected while disconnected, but the app is not yet aware of. The app will automatically add the last of the missing shots to the timesheet to ensure that the total time is correct.
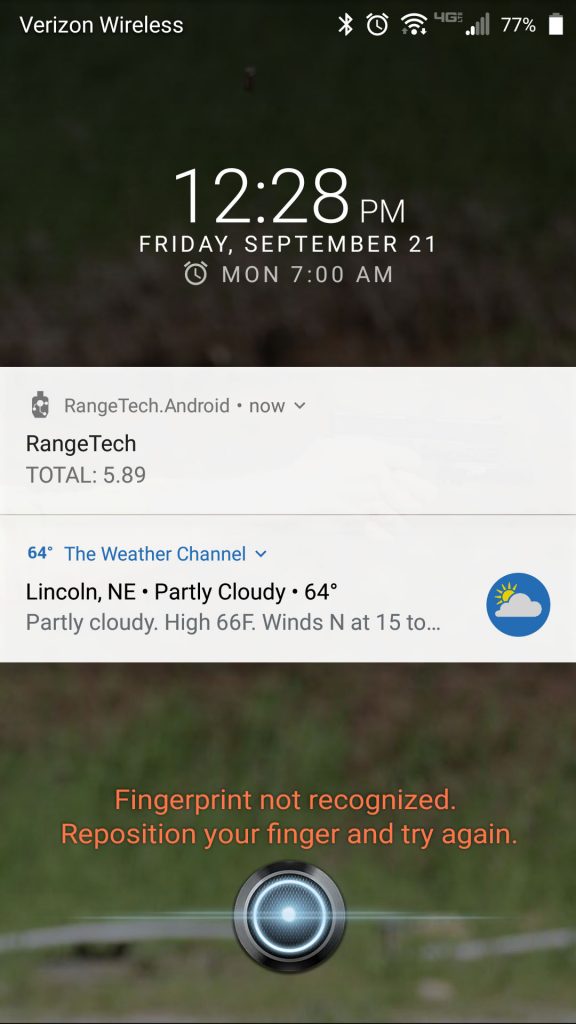
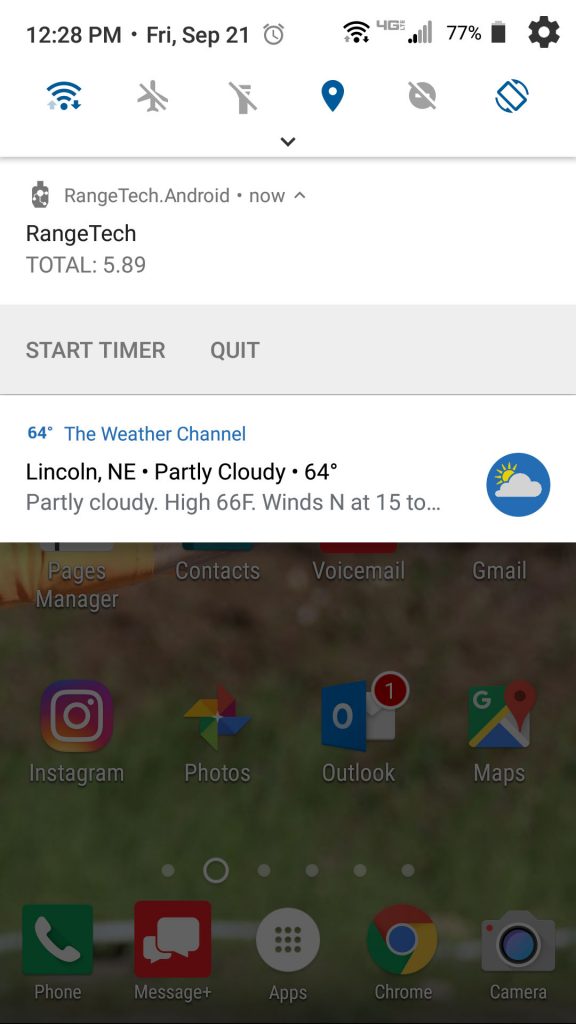

Android Only Feature
Lock Screen
RangeTech BlueTooth can be run and controlled when your device is locked, in order to save battery, and prevent accidental button presses on your touchscreen.
Simply lock your screen with the RangeTech app open, and then wake your device up. The RangeTech notification will display the time of the last shot of the current string, and you can swipe down on the notification to access a Start/Restart button.
Tips for RO use
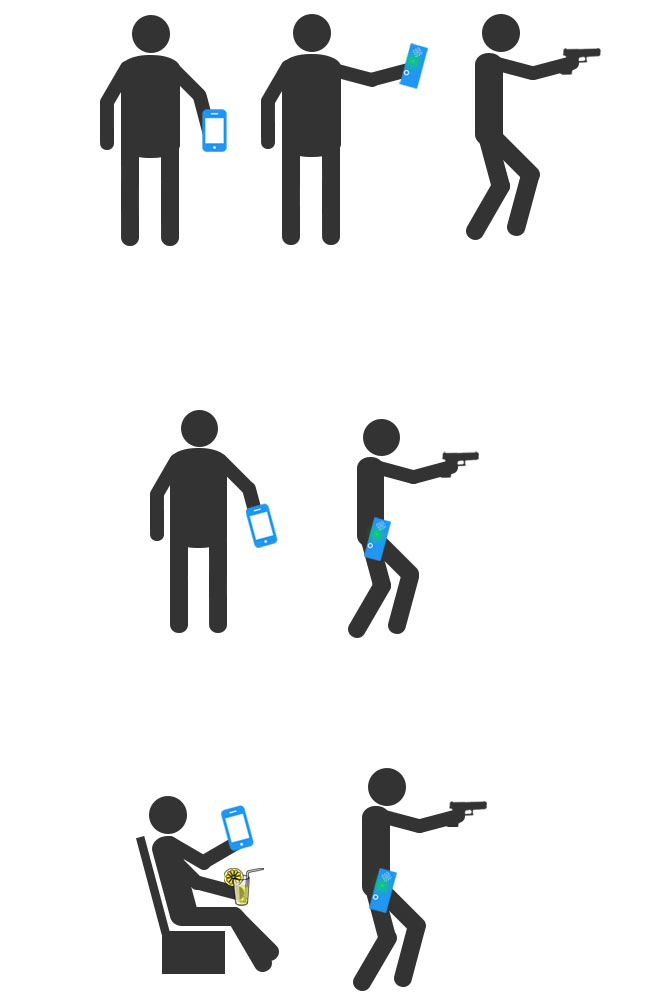
As with any other shot timer, the RO can hold the shot timer and the paired tablet/phone is left on the table or with the scorekeeper
OR
Clip the RangeTech shot timer to the shooter and run everything from a safe and comfortable distance.
Safer, easier, and sensible. Avoid potential collisions and issues that arise when ROs have to be all up in ya business! Lemonade optional.
Under "Announcements and Buttons" in the main menu you can disable the control button on the shot timer to prevent shooters from "accidentally" interfering with it.* Assuming default settings
Tips for Personal Use
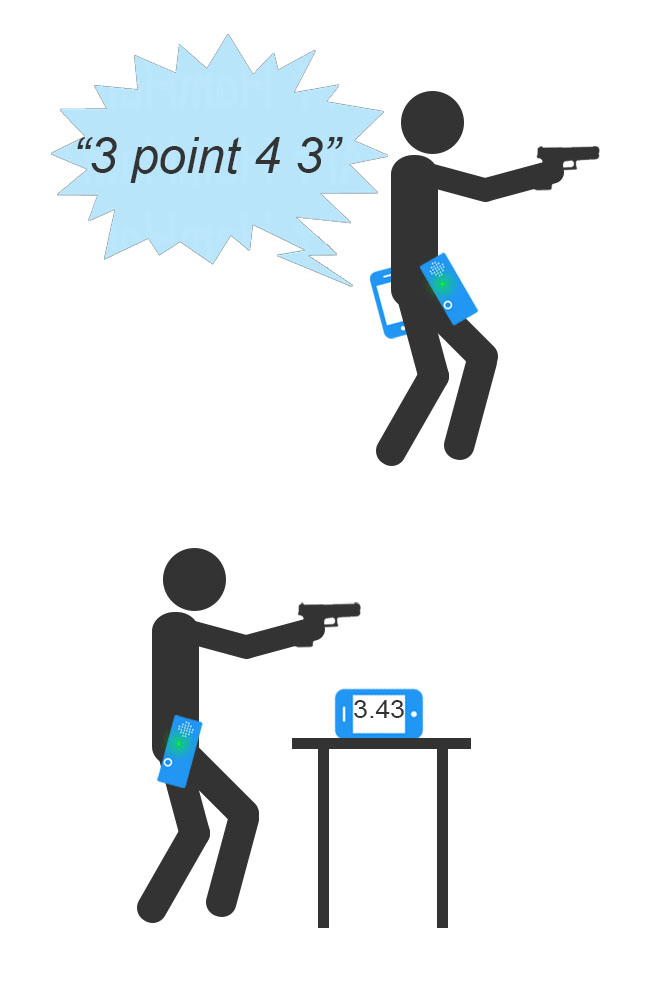
Press and hold the button on the timer and your phone will audibly “announce” the current string’s total raw time.*
Turn your phone/tablet sideways to put RangeTech into “billboard” display. This shows the latest string’s raw time in large, easy-to-read font!* Assuming default settings

